from lila.core.app import App
from app.routes.routes import routes
from app.routes.api import routes as api_routes
from lila.core.middleware import Middleware
from app.config import PORT, HOST, DEBUG
from app.middlewares.defaults import (
LoggingMiddleware,
IPBlockingMiddleware,
URLBlockingMiddleware,
MaliciousExtensionMiddleware,
SensitivePathMiddleware,
ErrorHandlerMiddleware,
)
import itertools
import uvicorn
import asyncio
# English: Combining application and API routes into a single list.
# Español: Combinando las rutas de la aplicación y la API en una única lista.
all_routes = list(itertools.chain(routes, api_routes))
# English: Here we activate the admin panel with default settings.
# Español: Aquí activamos el panel de administrador con configuraciones predeterminadas.
# from app.routes.admin import Admin
# from app.models.user import User
# admin_routes=Admin(models=[User])
# all_routes = list(itertools.chain(routes, api_routes,admin_routes))
# English: Marker for the admin routes in main.py.
# Español: Marcador para las rutas de administrador en main.py.
# admin_marker
cors = None
# English: CORS usage example
# Español : Ejemplo de utilización de CORS
# cors={
# "origin": ["*"],
# "allow_credentials" : True,
# "allow_methods":["*"],
# "allow_headers": ["*"]
# }
# app = App(debug=True, routes=all_routes,cors=cors)
# English:necessary for cli command modify react cors for development
# Español:necesario para el comando cli modificar cors de react para desarrollo
# react_marker
middlewares = [
Middleware(LoggingMiddleware),
Middleware(IPBlockingMiddleware),
Middleware(URLBlockingMiddleware),
Middleware(MaliciousExtensionMiddleware),
Middleware(SensitivePathMiddleware),
Middleware(ErrorHandlerMiddleware),
]
# English: Initializing the application with debugging enabled and the combined routes.
# Español: Inicializando la aplicación con la depuración activada y las rutas combinadas.
app = App(debug=DEBUG, routes=all_routes, cors=cors, middleware=middlewares)
# English: To ensure SEO (bots, AI), caching, and HTML hydration, uncomment these lines.
# Adding {% include "react/cache/index.html" %} to
# Español :Para tener seo (bots,ia) ,cache y que react hidrate el html ,descomenta estas lineas.
# Agregadando en
, {% include "react/cache/index.html" %}
# import subprocess
# import sys
# @app.on_event("startup")
# async def startup_event():
# print("♻️ Prerender for react...")
# url_with_port =f" http://{HOST}:{PORT}"
# subprocess.Popen([
# sys.executable,
# "-m",
# "cli.prerender",
# "--url",
# url_with_port.strip()
# ])
# English: Asynchronous main function to run the application server.
# Español: Función principal asíncrona para ejecutar el servidor de la aplicación.
async def main():
# English: Starting the Uvicorn server with the application instance.
# Español: Iniciando el servidor Uvicorn con la instancia de la aplicación.
uvicorn.run("main:app", host=HOST, port=PORT, reload=True)
# English: Entry point for the script, running the main asynchronous function.
# Español: Punto de entrada del script, ejecutando la función principal asíncrona.
if __name__ == "__main__":
try:
asyncio.run(main())
except KeyboardInterrupt:
# English: Gracefully shutting down the application on keyboard interrupt.
# Español: Apagando la aplicación de manera ordenada al interrumpir con el teclado.
print("Shutting down the application...")
pass
Routes
Routes are the access points to the application. In Lila, routes are defined in the
routes directory (by default, but you can place them
wherever you want) and
imported into main.py for use. Routes can be configured
to handle HTTP requests, API
methods, and more.
In addition to JSONResponse you can use HTMLResponse, RedirectResponse and
PlainTextResponse, or
StreamingResponse, to transmit data in real-time (useful for streaming video/audio or
large responses).
Below is an example of how routes are defined in Lila:
# Import from lila.core JSONResponse.
from lila.core.responses import JSONResponse
# Manages routes for API endpoints.
from lila.core.routing import Router
# Initializes the router instance to handle API app.routes.
router = Router()
# Defines a simple API route that supports the GET method.
@router.route(path='/api', methods=['GET'])
async def api(request: Request):
"""Api function"""
# English: Returns a simple JSON response for API verification.
return JSONResponse({'api': True})
Get URL Parameters
In this function, we receive a parameter via the URL using {param}.
If the parameter is not provided, it defaults to 'default'.
The response is a JSON containing the received value.
@router.route(path='/url_with_param/{param}', methods=['GET'])
async def param(request: Request):
param = request.path_params.get('param', 'default')
return JSONResponse({"received_param": param})
Or you can also do it like this:
@router.route(path='/url_with_param/?query_param', methods=['GET','POST'])
async def query_param(request: Request):
query_param = request.query_params.get('query_param', 'query_param')
return JSONResponse({"received_param": query_param})
from lila.core.responses import JSONResponse # Simplifies sending JSON responses.
from lila.core.routing import Router # Manages API app.routes.
from lila.core.request import Request # Handles HTTP requests in the application.
from pydantic import EmailStr, BaseModel # Validates and parses data models for input validation.
from app.helpers.security import get_user_by_id_and_token
from app.middlewares.middlewares import validate_token
from app.helpers.validate import responseValidationError #import helper to response error for pydantic (opcional)
router = Router()
Middleware and Decorators Usage
Middlewares allow intercepting requests before they reach the main logic of the API.
In this example, we use @validate_token to validate a
JWT token in the
request header.
@router.route(path='/api/token', methods=['GET','POST'])
@validate_token # Middleware to validate JWT token.
async def api_token(request: Request):
return JSONResponse({'api': True})
Data Validation with Pydantic
Pydantic allows defining data models that automatically validate user input.
Additionally, specifying a model in the route generates automatic documentation in
/docs.
from pydantic import EmailStr, BaseModel
from app.helpers.validate import responseValidationError
class ExampleModel(BaseModel):
email: EmailStr # Ensures a valid email.
password: str # String for password.
@router.route(path='/api/example', methods=['POST'], model=ExampleModel)
async def login(request: Request):
body = await request.json()
try:
input = ExampleModel(**body) # Automatic validation with Pydantic.
except Exception as e:
return responseValidationError(e)
return JSONResponse({"email": input.email, "password": input.password})
Automatic Documentation Generation
Thanks to the integration with Pydantic, the API documentation is generated
automatically
and is accessible from /docs. You can also generate an
OpenAPI JSON file for external tools.
router.swagger_ui() # Enables Swagger UI for API documentation.
router.openapi_json() # Generates OpenAPI JSON for external tools.
Importing Routes in main.py
To use the routes defined in the router, you need to obtain them with
router.get_routes() and import them into main.py.
routes = router.get_routes() # Retrieves all defined app.routes.
Route Prefixes and HTTP Method
Shortcuts
Routes can now have a prefix, which allows grouping
multiple endpoints under a common path.
Additionally, you can define routes directly with HTTP methods as functions: get,
post, put, delete.
# English: Initialize the router instance for managing API routes.
router = Router(prefix="v1/api")
# English: Define a simple API route that supports GET method.
@router.get("/")
async def api(request: Request):
"""Api function""" # use doc for description http://127.0.0.1:8000/openapi.json and http://127.0.0.1:8000/docs
# English: Returns a simple JSON response for API verification.
return JSONResponse({"api": True})
# Español: Define una ruta de API que soporta los métodos GET y POST.
@router.route(path="/token", methods=["GET", "POST"])
# English: Middleware to validate the JWT Token.
@validate_token
async def api_token(request: Request):
"""Api Token function""" # use doc for description http://127.0.0.1:8000/openapi.json and http://127.0.0.1:8000/docs
print(get_user_by_token(request=request))
return JSONResponse({"api": True})
Using prefixes helps organize your API under a common version path (e.g., v1/api),
while method-specific decorators (@router.get, @router.post, etc.)
make route definitions cleaner and more intuitive.
HTTP Method Examples with Prefix
and Pydantic Models
Routes now support the HTTP methods get, post,
put, and delete
directly.
You can also attach Pydantic models for automatic input validation and documentation
generation.
from lila.core.responses import JSONResponse
from lila.core.routing import Router
from lila.core.request import Request
from pydantic import BaseModel
router = Router(prefix="v1/api")
# ---------------- GET Example ----------------
@router.get("/items/{item_id}")
async def get_item(request: Request):
"""Fetch an item by ID."""
item_id = request.path_params.get("item_id")
return JSONResponse({"item_id": item_id, "status": "fetched"})
# ---------------- POST Example ----------------
class CreateItemModel(BaseModel):
name: str
description: str
@router.post("/items", model=CreateItemModel)
async def create_item(request: Request):
"""Create a new item."""
body = await request.json()
input_data = CreateItemModel(**body)
return JSONResponse({"name": input_data.name, "description": input_data.description})
# ---------------- PUT Example ----------------
class UpdateItemModel(BaseModel):
name: str
description: str
@router.put("/items/{item_id}", model=UpdateItemModel)
async def update_item(request: Request):
"""Update an existing item by ID."""
item_id = request.path_params.get("item_id")
body = await request.json()
input_data = UpdateItemModel(**body)
return JSONResponse({"item_id": item_id, "updated_name": input_data.name})
# ---------------- DELETE Example ----------------
@router.delete("/items/{item_id}")
async def delete_item(request: Request):
"""Delete an item by ID."""
item_id = request.path_params.get("item_id")
return JSONResponse({"item_id": item_id, "status": "deleted"})
These examples demonstrate how to:
- Use a
prefix for versioned API endpoints.
- Use method-specific decorators like
@router.get,
@router.post, etc.
- Automatically validate input and generate documentation using Pydantic models.
- Receive URL parameters and JSON bodies.
Documentation is automatically generated at /docs and /openapi.json.
Static Files
To load static files (JS, CSS, etc.), you can use the
mount()
method.
The default parameters are:
path: str = '/public', directory: str = 'public', name: str = 'public'
from lila.core.routing import Router
# Creating an instance of the Router
router = Router()
# Mounting the static files in the 'public' folder, with URL '/public' by default
router.mount()
Template Rendering (Jinja2 )
In Lila, you can use
Jinja2 to render
HTML with server data
Jinja2 is the default for rendering HTML templates. You can pass data like
translations, values, lists, or dictionaries using the
context
parameter.
Basic Usage in Routes
@router.route(path="/", methods=["GET"])
async def home(request: Request):
context = {}
response = render(
request=request,
template="index",
context=context
)
# Renders the 'index' template
return response
The
render
Function
The
render
function is located in
lila.core.templates:
def render(
request: Request,
template: str,
context: dict = {},
theme_: bool = True,
translate: bool = True,
files_translate: list = [],
lang_default: str = None,
templates=templates
)
Parameter
Description
-
request:
The
Request
object.
-
template
(str):
Template name (without the
.html
extension).
-
context
(dict):
Data to pass to the template (dictionaries, lists, etc.).
-
theme_
(bool, default=True):
Applies the default
visual theme.
-
translate
(bool, default=True):
Enables the built-in
translation system.
-
files_translate
(list):
List of additional
translation files.
-
lang_default
(str):
Forced default language (ideal for SEO in routes like
/es,
/en,
etc.).
-
templates:
Base template
collection used by Lila.
In Lila, you can also use
translate
to pass translations to Jinja2, and parameters like
title
or
version
(ideal for structuring APIs: "v1", "v2").
Asset Optimization in Production (Images & CSS)
Optimized Images with Jinja2
Lila automatically optimizes your images for better performance and SEO.
When using the image() function in your templates, the system
converts images to WebP format, resizes them if necessary,
and compresses them without losing visual quality.
Usage in HTML (Jinja2)
<img src="{{ image('img/lila.png') }}" alt="Lila" width="100" height="100" />
What Happens Automatically
- The image is converted to WebP.
- If the image is wider than 1920px, it is resized.
- Compression is applied using optimized quality.
- The optimized image is cached for future requests.
Automatic CSS Minification
The public() function automatically detects whether a minified
version of your CSS file exists. If it does not, the system generates it
automatically, improving load times and SEO performance.
Usage in HTML (Jinja2)
<link rel="stylesheet" href="{{ public('css/lila.css') }}" />
Automatic Behavior
- If
lila.min.css exists, it will be used automatically.
- If not, it is generated automatically.
- Minified files reduce file size and load faster.
Base Context Injection
All optimization features work thanks to the base context automatically
injected into Jinja2 templates:
def get_base_context(request, files_translate=[], lang_default=None):
context = {
"title": TITLE_PROJECT,
"version": VERSION_PROJECT,
"lang": lang_default if lang_default else lang(request),
"translate": t("translations", request, lang_default=lang_default),
"image": image,
"static": public,
"public": public
}
for file_name in files_translate:
context["translate"].update(
t(file_name, request, lang_default=lang_default)
)
return context
Performance & SEO Benefits
- ✅ Faster page loading
- ✅ Smaller file sizes
- ✅ Improved Google Lighthouse score
- ✅ Automatic WebP image generation
- ✅ SEO-friendly asset delivery
- ✅ Zero manual optimization required
Session
Management
Lila provides a simple yet powerful session management system built on top of
itsdangerous
for cryptographically signed session data. This ensures that session data cannot be
tampered with on the client side.
The
Session
class provides a set of static methods to handle session data.
Setting Session Data
The
setSession
method is used to store session data in a cookie. It can handle strings, dictionaries,
and lists, which are automatically serialized to JSON.
from lila.core.session import Session
from lila.core.responses import JSONResponse
@router.route("/set-session", methods=["GET"])
async def set_session_example(request: Request):
response = JSONResponse({"message": "Session has been set"})
session_data = {"user_id": 123, "username": "lila_user"}
Session.setSession(new_val=session_data, response=response, name_cookie="user_session")
return response
The
setSession
method accepts several parameters to customize the cookie, such as
secure,
samesite,
max_age,
etc.
Getting Session Data
The
getSession
method retrieves the raw, signed session data from a cookie. To get the unsigned and
validated data, use
getSessionValue
or
unsign.
Unsigning and Validating
Session Data
The
unsign
and
getSessionValue
methods get the session data in its original form after verifying the signature.
getSessionValue
is recommended because it also gracefully handles expired signatures.
from lila.core.session import Session
@router.route("/get-session", methods=["GET"])
async def get_session_example(request: Request):
session_data = Session.getSessionValue(request=request, key="user_session")
if session_data:
return JSONResponse({"session_data": session_data})
else:
return JSONResponse({"message": "No session found or session is invalid/expired."}, status_code=401)
Deleting a Session
The
deleteSession
method is used to delete a session cookie from the client's browser.
from lila.core.session import Session
from lila.core.responses import JSONResponse
@router.route("/logout", methods=["GET"])
async def logout(request: Request):
response = JSONResponse({"message": "Logged out successfully"})
Session.deleteSession(response=response, name_cookie="user_session")
return response
Full Session Class
Reference
Here is the full code for the
Session
class for your reference.
import json
from app.config import SECRET_KEY
from itsdangerous import BadSignature, URLSafeTimedSerializer, SignatureExpired
from lila.core.request import Request
from typing import Any, Union, Optional, Dict, List
from lila.core.logger import Logger
serializer = URLSafeTimedSerializer(SECRET_KEY)
class Session:
@staticmethod
def setSession(
new_val: str | dict | list,
response,
name_cookie: str = "session",
secure: bool = True,
samesite: str = "strict",
max_age: int = 3600,
domain: Optional[str] = None,
http_only: bool = True,
path: str = "/",
) -> bool:
try:
if isinstance(new_val, (dict, list)):
new_val = json.dumps(new_val)
else:
new_val = str(new_val)
signed_session = serializer.dumps(new_val)
response.set_cookie(
key=name_cookie,
value=signed_session,
max_age=max_age,
expires=max_age,
secure=secure,
httponly=http_only,
samesite=samesite,
domain=domain,
path=path,
)
return True
except (TypeError, ValueError, Exception) as e:
Logger.error(f"Error setting session: {str(e)}")
print(f"Error session {str(e)}")
return False
@staticmethod
def getSession(key: str, request: Request) -> Optional[str]:
return request.cookies.get(key)
@staticmethod
def unsign(
key: str, request: Request, max_age: Optional[int] = None
) -> Union[Dict, List, str, None]:
session_data = request.cookies.get(key)
if not session_data:
return None
try:
unsigned_data = serializer.loads(session_data, max_age=max_age)
try:
return json.loads(unsigned_data)
except json.JSONDecodeError:
return unsigned_data
except BadSignature:
msg = f"Invalid session signature for cookie: {key}"
print(msg)
Logger.warning(msg)
return None
except Exception as e:
msg = f"Error unsigning session: {str(e)}"
print(msg)
Logger.error(msg)
return None
@staticmethod
def deleteSession(response, name_cookie: str) -> bool:
try:
response.delete_cookie(name_cookie)
return True
except Exception as e:
msg = f"Error deleting session: {str(e)}"
print(e)
Logger.error(msg)
return False
@staticmethod
def getSessionValue(
request: Request, key: str = 'auth', max_age: Optional[int] = 3600
) -> Union[Dict, List, str, None]:
session_data = request.cookies.get(key)
if not session_data:
return None
try:
unsigned_data = serializer.loads(session_data, max_age=max_age)
try:
return json.loads(unsigned_data)
except json.JSONDecodeError:
return unsigned_data
except BadSignature:
msg = f"Invalid session signature for cookie: {key}"
print(msg)
Logger.warning(msg)
return None
except SignatureExpired:
msg = f"Session expired for cookie: {key}"
print(msg)
Logger.warning(msg)
return None
except Exception as e:
msg = f"Error unsigning session: {str(e)}"
print(msg)
Logger.error(msg)
return None
File Upload Helper
The upload
helper provides a complete solution for handling file
uploads in your application,
including validation, security checks, and translation support.
This helper automatically handles:
- HTTP method validation (POST only)
- Content-Type validation (multipart/form-data)
- File extension validation
- File size limits
- Empty file detection
- Secure filename handling
- Automatic directory creation
- Translation support for error messages
Parameters
The upload
function accepts these parameters:
request: Request # Starlette request object
name_file: str | list # Field name for file upload (default: 'file')
UPLOAD_DIR: str # Directory to save files (default: 'uploads')
ALLOWED_EXTENSIONS: set # Allowed file extensions (default: {'txt', 'pdf', 'png', 'jpg', 'jpeg', 'gif'})
MAX_FILE_SIZE: int # Maximum file size in bytes (default: 10MB)
Usage Example
from app.helpers.files import upload
@router.route("/upload", methods=["POST"])
async def uploadFile(request: Request):
response = await upload(request=request, name_file="file")
return response
Frontend Implementation
<form onsubmit="upload(event);">
<fieldset>
<input type="file" name="file" required>
</fieldset>
<button type="submit">
<i class="icon-check-circle"></i>
Upload Files
</button>
</form>
<script>
async function upload(event) {
event.preventDefault();
const formElement = event.target;
const formData = new FormData(formElement);
try {
const response = await fetch('/upload', {
method: 'POST',
body: formData,
});
const result = await response.json();
if (!response.ok) throw new Error(result.message);
alert('File uploaded successfully!');
} catch (error) {
alert(error.message);
}
}
</script>
Response Format
The helper returns a JSONResponse with this structure:
{
"file": "/uploads/filename.ext",
"success": true,
"message": "File uploaded successfully"
}
{
"error": true,
"success": false,
"message": "Error message in user's language"
}
Important Notes
If you are using Windows or the file is not created in the Path, remember to
configure it in app/config.py
PATH_UPLOADS = path.join(os.getcwd(), "public", "img", "uploads")
Markdown /HTML
To render markdown
files, the
renderMarkdown
function is used, which receives the following parameters:
request, file: str, base_path: str='templates/markdown/', css_files: list=[], js_files: list=[], picocss: bool=False
file
is the name of the Markdown file starting from base_path.
For example: index.md.
It will look for index.md
inside templates/markdown/.
css_files
and
js_files
are lists of CSS and JS files to include in the rendered HTML.
picocss
is a boolean indicating whether the PicoCSS stylesheet should be loaded.
Now, you can use layout.html
in templates/markdown/ as a base editable template:
Below is an example of rendering a Markdown file with bilingual support in Lilac:
# {{ translate["welcome"] }}
This is a simple **Markdown** example.
## {{ translate["features"] }}
- {{ translate["easy_write"] }}
- {{ translate["convert_html"] }}
- {{ translate["supports_links"] }}
### {{ translate["example_code"] }}
\`\`\`
print("Hello, Markdown!")
\`\`\`
Python code to render it using renderMarkdown:
from lila.core.templates import renderMarkdown
@router.route(path='/markdown', methods=['GET'])
async def home(request: Request):
css = ["/public/css/styles.css"]
response = renderMarkdown(
request=request,
file='example',
css_files=css,
picocss=True
)
return response
Internationalization (Translations)
Translations are used to internationalize an application and display content in different
languages. In Lila, translations are stored in the app/locales
directory
and
can be dynamically loaded into the application.
Forcing Default Language in Routes
The render
method accepts a lang_default
parameter to force a
specific language for the rendered template:
# Force Spanish language
@router.route(path="/es", methods=["GET"])
async def home(request: Request):
response = render(
request=request,
template="index",
lang_default="es" # Forces Spanish translations
)
return response
# Force English language
@router.route(path="/en", methods=["GET"])
async def home(request: Request):
response = render(
request=request,
template="index",
lang_default="en" # Forces English translations
)
return response
Translation Files
To load a locale file, use the translate
function from
app.helpers.helpers.
You can access translations using:
translate
- returns a dictionary with all translationstranslate_
- returns a specific translation (returns original text if
not found)
Example translation file (app/locales/translations.json):
{
"Send": {
"es": "Enviar",
"en": "Send"
},
"Cancel": {
"es": "Cancelar",
"en": "Cancel"
},
"Accept": {
"es": "Aceptar",
"en": "Accept"
},
"Email": {
"es": "Email",
"en": "Email"
},
"Name": {
"es": "Nombre",
"en": "Name"
},
"Back": {
"es": "Volver",
"en": "Back"
},
"Hi": {
"es": "Hola",
"en": "Hi"
}
}
Using Translations
Get a specific translation:
from app.helpers.translate import translate_
msg_error_login = translate_(
key="Incorrect email or password",
request=request,
file_name="guest"
)
Get all translations from a file:
from app.helpers.translate import translate
all_translations = translate(
request=request,
file_name="guest"
)
Models (SQLAlchemy)
Models are used to define the structure of data in
the application.
SQLAlchemy as the default
ORM
for
database management.
SQLAlchemy allows creating database models,
executing queries, and handling migrations
efficiently.
Using Models
The `Base` class, imported from `lila.core.database`, serves as the foundation for
all models .
Models inherit from `Base` to define database tables with SQLAlchemy.
Example: User Model
This example demonstrates how to create a `User` model using SQLAlchemy.
The model defines a `users` table with columns such as `id`, `name`, `email`,
`password`,
`token`,
`active`, and `created_at`.
from sqlalchemy import Table,Column,Integer,String,TIMESTAMP
from lila.core.database import Base
from app.connections import connection
class User(Base):
__tablename__='users'
id = Column(Integer, primary_key=True,autoincrement=True)
name=Column( String(length=50), nullable=False)
email=Column( String(length=50), unique=True)
password=Column(String(length=150), nullable=False)
token=Column(String(length=150), nullable=False)
active=Column( Integer, nullable=False,default=1)
created_at=Column( TIMESTAMP)
#Example of how to use SQLAlchemy to make queries to the database
def get_all(select: str = "id,email,name", limit: int = 1000) -> list:
query = f"SELECT {select} FROM users WHERE active =1 LIMIT {limit}"
result = connection.query(query=query,return_rows=True)#Return rows
return result
#Example of how to use SQLAlchemy to make queries to the database
def get_by_id(id: int, select="id,email,name") -> dict:
query = f"SELECT {select} FROM users WHERE id = :id AND active = 1 LIMIT 1"
params = {"id": id}
row = connection.query(query=query, params=params,return_row=True)#Retrurn row
return row
#Example using ORM abstraction in SQLAlchemy
@classmethod
def get_all_orm(cls, db: Session, limit: int = 1000):
result = db.query(cls).filter(cls.active == 1).limit(limit).all()
return result
#Example of how to use the class to make queries to the database
users = User.get_all()
user = User.get_by_id(1)
For details on SQLAlchemy, visit the official documentation:
SQLAlchemy Documentation.
CLI Model Generator
Automatically generate SQLAlchemy model skeletons to speed up your development
workflow.
The CLI Model Generator is a powerful command-line tool that creates complete
SQLAlchemy model templates
with CRUD operations, ORM methods, and raw SQL examples. It saves time by providing
a consistent structure
for all your models.
Available Commands
Create a New Model
lila-model create --name ModelName
# or with custom table name
lila-model create --name Product --table products
List All Models
Generated Model Structure
Each generated model includes basic columns (id, name, active, created_at) and
complete CRUD methods.
The model also includes comments with examples of all available column types.
from sqlalchemy import Column, Integer, String, TIMESTAMP, func
from sqlalchemy.orm import Session, load_only
from core.database import Base
from app.connections import connection
class Product(Base):
__tablename__ = "products"
id = Column(Integer, primary_key=True, autoincrement=True)
name = Column(String(length=100), nullable=False)
active = Column(Integer, nullable=False, default=1)
created_at = Column(TIMESTAMP, nullable=False, server_default=func.now())
@classmethod
def get_all(cls, select: str = "id,name", limit: int = 1000):
db = connection.get_session()
try:
column_names = [c.strip() for c in select.split(',')]
columns_to_load = [getattr(cls, c) for c in column_names]
result = db.query(cls).options(load_only(*columns_to_load)).filter(cls.active == 1).limit(limit).all()
return [{col: getattr(row, col) for col in column_names} for row in result]
finally:
db.close()
@classmethod
def get_by_id(cls, db: Session, id: int):
return db.query(cls).filter(cls.id == id, cls.active == 1).first()
@classmethod
def insert(cls, db: Session, params: dict) -> 'Product':
record = cls(name=params.get("name"), active=params.get("active", 1))
db.add(record)
return record
@classmethod
def update(cls, db: Session, id: int, params: dict) -> bool:
record = cls.get_by_id(db, id)
if record:
for key, value in params.items():
if hasattr(record, key):
setattr(record, key, value)
return True
return False
@classmethod
def delete(cls, db: Session, id: int) -> bool:
record = cls.get_by_id(db, id)
if record:
record.active = 0
return True
return False
Usage Example
# Get all products
products = Product.get_all(select="id,name,price", limit=50)
# Get product by ID
db = connection.get_session()
product = Product.get_by_id(db, 1)
# Insert new product
new_product = Product.insert(db, {"name": "Laptop", "price": 999.99})
db.commit()
# Update product
Product.update(db, 1, {"name": "Gaming Laptop"})
db.commit()
# Soft delete
Product.delete(db, 1)
db.commit()
db.close()
Complete Workflow
- Create the model:
lila-model create --name Product
- Edit
app/models/product.py to add custom columns
- The model will be automatically loaded for migrations (no manual import needed).
- Run migrations:
lila-migrations migrate
Middlewares
Middleware functions are used to intercept requests before they reach the main logic of
the application.
In Lila, middlewares are defined in the app/middlewares
directory (can be
modified to any file and/or directory).
Middlewares can be used for tasks such as authentication, logging, and error handling.
By default, Lila comes with 3 middlewares to start any application. Middlewares can be
used with decorators @my_middleware.
login_required,
to validate that you have a signed session, for the 'auth'
key that is passed as a parameter to be able to modify it as you wish.
If this session is not found, it redirects to the URL that is passed as a parameter, by
default, it is "/login".
Otherwise, it will continue its course executing the route or function.
Then we have session_active,
which is used to verify if you have an active
session.
It will redirect to the URL that is received as a parameter, by default, it is
"/dashboard".
The third is validate_token,
which is used to validate a JWT token thanks
to the get_token
helpers imported in
from app.helpers.security import get_token.
from lila.core.session import Session
from lila.core.responses import RedirectResponse,JSONResponse
from lila.core.request import Request
from functools import wraps
from app.helpers.security import get_token
def login_required(func,key:str='auth',url_return='/login'):
@wraps(func)
async def wrapper(request, *args, **kwargs):
session_data= Session.unsign(key=key,request=request)
if not session_data:
return RedirectResponse(url=url_return)
return await func(request,*args,**kwargs)
return wrapper
def session_active(func,key:str='auth',url_return:str ='/dashboard'):
@wraps(func)
async def wrapper(request,*args,**kwargs):
session_data= Session.unsign(key=key,request=request)
if session_data:
return RedirectResponse(url=url_return)
return await func(request,*args,**kwargs)
return wrapper
def validate_token(func):
@wraps(func)
async def wrapper(request: Request, *args, **kwargs):
await check_token(request=request)
return await func(request, *args, **kwargs)
return wrapper
async def check_token(request:Request):
token = request.headers.get('Authorization')
if not token:
return JSONResponse({'session':False,'message': 'Invalid token'},status_code=401)
token = get_token(token=token)
if isinstance(token,JSONResponse):
return token
Here we give you several examples of how to use all 3, with the decorators.
#Middleware to validate the JWT Token.
@router.route(path='/api/token', methods=['GET','POST'])
@validate_token #Middleware
async def api_token(request: Request):
"""Api Token function"""
print(get_user_by_id_and_token(request=request))
return JSONResponse({'api': True})
#Middleware to validate session active
@router.route(path='/dashboard', methods=['GET'])
@login_required #Middleware
async def dashboard(request: Request):
response = render(request=request, template='dashboard', files_translate=['authenticated'])
return response
#Middleware validate if user get session active (if user get session redirect '/dashboard')
@router.route(path='/login', methods=['GET'])
@session_active #Middleware
async def login(request: Request):
response = render(request=request, template='auth/login', files_translate=['guest'])
return response
Security Middleware
Lila Framework includes a built-in ErrorHandlerMiddleware
that not only
handles unhandled exceptions but also provides robust security checks to protect your
application from malicious requests. This middleware is designed to block suspicious
IPs, URLs, and sensitive paths, ensuring that your application remains secure.
Features
-
IP Blocking:
Blocks IP addresses that have been flagged for malicious activity. IPs are blocked
for 6 hours by default.
-
URL Blocking:
Blocks specific URLs that are known to be malicious or suspicious.
-
Sensitive Paths Blocking:
Blocks access to sensitive paths such as
/etc/passwd,
.env,
and others.
-
Malicious Extensions Blocking:
Blocks URLs containing malicious file extensions like
.php,
.asp,
.jsp,
and .aspx.
-
HTTP Detection:
Blocks requests containing
"http"
in query parameters or body content.
Configuration
The middleware uses three JSON files located in the app/security
directory:
blocked_ips.json:
Stores blocked IPs with their expiration time.blocked_urls.json:
Stores blocked URLs with their expiration time.sensitive_paths.json:
Stores a list of sensitive paths to block.
If these files do not exist, they are automatically created and initialized with default
values:
[
"/etc/passwd",
".env",
"wp-content",
"docker/.env",
"owa/auth/logon.aspx",
"containers/json",
"models",
"autodiscover/autodiscover.json",
"heapdump",
"actuator/heapdump",
"cgi-bin/vitogate.cgi",
"CFIDE/wizards/common/utils.cfc",
"var/www/html/.env",
"home/user/.muttrc",
"usr/local/spool/mail/root",
"etc/postfix/master.cf"
]
Usage
The ErrorHandlerMiddleware
is automatically applied to all requests. You
can customize its behavior by modifying the JSON files in the security
directory.
from starlette.middleware.base import BaseHTTPMiddleware
from lila.core.responses import JSONResponse, HTMLResponse
from lila.core.request import Request
from lila.core.logger import Logger
from datetime import datetime, timedelta
import json
import os
def load_blocked_data(file_path, default_value):
try:
if not os.path.exists(file_path):
with open(file_path, "w") as file:
json.dump(default_value, file, indent=4)
return default_value
with open(file_path, "r") as file:
content = file.read().strip()
if not content:
with open(file_path, "w") as file:
json.dump(default_value, file, indent=4)
return default_value
try:
return json.loads(content)
except json.JSONDecodeError:
with open(file_path, "w") as file:
json.dump(default_value, file, indent=4)
return default_value
except Exception as e:
Logger.error(f"Error loading {file_path}: {str(e)}")
return default_value
def save_blocked_data(file_path, data):
try:
with open(file_path, "w") as file:
json.dump(data, file, indent=4)
except Exception as e:
Logger.error(f"Error saving {file_path}: {str(e)}")
async def is_blocked(blocked_data, key, request: Request):
if key in blocked_data:
expiration_time = datetime.fromisoformat(blocked_data[key]["expiration_time"])
if datetime.now() < expiration_time:
req = await Logger.request(request=request)
Logger.warning(f"Blocked: {key} \n {req}")
return True
return False
class ErrorHandlerMiddleware(BaseHTTPMiddleware):
def __init__(
self,
app,
blocked_ips_file="security/blocked_ips.json",
blocked_urls_file="security/blocked_urls.json",
sensitive_paths_file="security/sensitive_paths.json",
):
super().__init__(app)
self.blocked_ips_file = blocked_ips_file
self.blocked_urls_file = blocked_urls_file
self.sensitive_paths_file = sensitive_paths_file
self.blocked_ips = load_blocked_data(blocked_ips_file, default_value={})
self.blocked_urls = load_blocked_data(blocked_urls_file, default_value={})
self.sensitive_paths = load_blocked_data(sensitive_paths_file, default_value=[])
async def dispatch(self, request, call_next):
try:
client_ip = request.client.host
url_path = request.url.path
query_params = str(request.query_params)
body = await request.body()
if await is_blocked(self.blocked_ips, client_ip, request=request):
return HTMLResponse(
content="Access Denied
Your IP has been temporarily blocked.
",
status_code=403,
)
if await is_blocked(self.blocked_urls, url_path, request=request):
return HTMLResponse(
content="Access Denied
This URL has been temporarily blocked.
",
status_code=403,
)
malicious_extensions = [".php", ".asp", ".jsp", ".aspx"]
if any(ext in url_path for ext in malicious_extensions):
self.blocked_ips[client_ip] = {
"expiration_time": (datetime.now() + timedelta(hours=6)).isoformat()
}
save_blocked_data(self.blocked_ips_file, self.blocked_ips)
return HTMLResponse(
content="Access Denied
Malicious URL detected.
",
status_code=403,
)
if "http" in query_params or "http" in str(body):
self.blocked_ips[client_ip] = {
"expiration_time": (datetime.now() + timedelta(hours=6)).isoformat()
}
save_blocked_data(self.blocked_ips_file, self.blocked_ips)
return HTMLResponse(
content="Access Denied
Malicious query parameters detected.
",
status_code=403,
)
if any(path in url_path or path in str(body) for path in self.sensitive_paths):
self.blocked_ips[client_ip] = {
"expiration_time": (datetime.now() + timedelta(hours=6)).isoformat()
}
save_blocked_data(self.blocked_ips_file, self.blocked_ips)
return HTMLResponse(
content="Access Denied
Sensitive path detected.
",
status_code=403,
)
Logger.info(await Logger.request(request=request))
response = await call_next(request)
return response
except Exception as e:
Logger.error(f"Unhandled Error: {str(e)}")
return JSONResponse(
{"error": "Internal Server Error", "success": False}, status_code=500
)
CLI Commands Reference
Lila Framework provides powerful CLI tools to speed up development. All commands
follow the pattern
lila-{command}
📦 Model Generator
Create SQLAlchemy models with CRUD methods automatically.
# Create a new model
lila-model create --name Product
# Create with custom table name
lila-model create --name Product --table products
# List all models
lila-model list-models
🏗️ Scaffold Generator
Generate complete CRUD functionality from existing models.
# Generate scaffold from model
lila-scaffold-crud --model Product
# Custom route name
lila-scaffold-crud --model Product --name products
🗄️ Migrations
Run database migrations to create tables from models.
# Run migrations
lila-migrations migrate
# Refresh (drop and recreate all tables)
lila-migrations migrate --refresh
🔐 Authentication
Generate authentication system with login, register, and password recovery.
# Generate auth system
lila-auth main
👤 Admin Panel
Create admin users and admin panel.
# Create admin user
lila-create-admin --password mypassword
# Create admin panel
lila-create-panel-admin --password mypassword
⚡ Minify Assets
Minify CSS and JavaScript files for production.
# Minify all CSS and JS files
lila-minify
⚛️ React Integration
Setup React development environment with Lila backend.
# Setup React
lila-react create
# Run react development server
lila-react dev
Connections to database
To use connections, you need to import the Database
class from
lila.core.database. With
that you can connect to your database, which can be SQLite, MySLQ, PostgreSQL or
whatever you
want to configure.
Below we leave you the example of how to connect. The connection will close automatically
after
being used, so you can use it as in this example in the variable connection
from lila.core.database import Database
#SQLite
#Example connection to a sqlite database
config = {"type":"sqlite","database":"test"} #test.db
connection = Database(config=config)
connection.connect()
#MySql
#Example connection to a mysql database
config = {"type":"mysql","host":"127.0.0.1","user":"root","password":"password","database":"db_test","auto_commit":True}
connection = Database(config=config)
connection.connect()
mysql_connection = connection
Migrations
In Lila Framework, database migrations can be managed using SQLAlchemy and Lila's
configuration
to make migrations as easy as possible. The framework now supports command-line
migrations through Typer,
providing a more intuitive and flexible way to manage your database schema.
Migration Methods
There are two main ways to define database tables:
1. Using Table
This method manually defines the table structure using SQLAlchemy's Table object.
from sqlalchemy import Table, Column, Integer, String, TIMESTAMP
from lila.core.database import Base # Import Base
table_users = Table(
'users', Base.metadata, # IMPORTANT: Use Base.metadata
Column('id', Integer, primary_key=True, autoincrement=True),
Column('name', String(length=50), nullable=False),
Column('email', String(length=50), unique=True),
Column('password', String(length=150), nullable=False),
Column('token', String(length=150), nullable=False),
Column('active', Integer, default=1, nullable=False),
Column('created_at', TIMESTAMP),
)
2. Using Models (Recommended)
This approach defines database tables as Python classes that inherit from "Base".
This is the recommended method as it provides more structure and ORM capabilities.
from lila.core.database import Base
from sqlalchemy import Column, Integer, String, TIMESTAMP
class User(Base):
__tablename__ = 'users'
id = Column(Integer, primary_key=True, autoincrement=True)
name = Column(String(length=50), nullable=False)
email = Column(String(length=50), unique=True)
password = Column(String(length=150), nullable=False)
token = Column(String(length=150), nullable=False)
active = Column(Integer, nullable=False, default=1)
created_at = Column(TIMESTAMP)
Run Migrations
Once your model is defined in app/models/, Lila will automatically load it
to register it in the database. Simply run:
Running Migrations
To execute migrations, use the following command in your terminal:
# Basic migration
lila-migrations
# Refresh all tables (drop and recreate)
lila-migrations --refresh
Command Options
migrate:
Run the database migrations--refresh:
Optional flag to drop and recreate all tables
Note: When using Models, make sure to import all your model classes
in the migrations file
so SQLAlchemy can detect them for migrations.
Auth Scaffold
In Lila Framework, you can now generate all authentication routes, templates, models,
and
middlewares automatically using a single command. This helps you quickly set up login,
registration, password reset, and dashboard functionality without manually creating
files.
Features
- Generates routes:
/login, /register,
/forgot-password,
/invalid-token, /change-password
- Creates the
dashboard and profile pages
- Includes middlewares, sessions, and validations using Pydantic
- Updates
main.py and cli/migrations.py automatically
Running Auth Scaffold
Use the following commands in your terminal:
# Run auth scaffold to generate routes, templates, models, and middlewares
lila-auth
Generated Files & Structure
The scaffold will create/update:
- Templates: login, register, forgot-password, change-password
- Models: updates
User and creates
AuthModel
- Routes & Functions: handlers for each template/action
- Middlewares: session and validation handling
CLI Scaffold Generator
Generate complete CRUD functionality from existing models with a single command. The
scaffold generator
creates routes, templates, and automatically imports everything into your
application.
Basic Usage
First, create your model using the model CLI, then generate the scaffold:
# Create a model first
lila-model create --name Product
# Generate complete CRUD scaffold
lila-scaffold-crud --model Product
# Custom route name
lila-scaffold-crud --model Product --name products
#execute migrations refresh
lila-migrations --refresh
What Gets Generated
The scaffold generator creates a complete CRUD system:
app/routes/{name}.py
- Complete CRUD routestemplates/html/{name}/index.html
- DataTable with modals- Auto-imports routes in
main.py
Generated Endpoints
The following routes are automatically created:
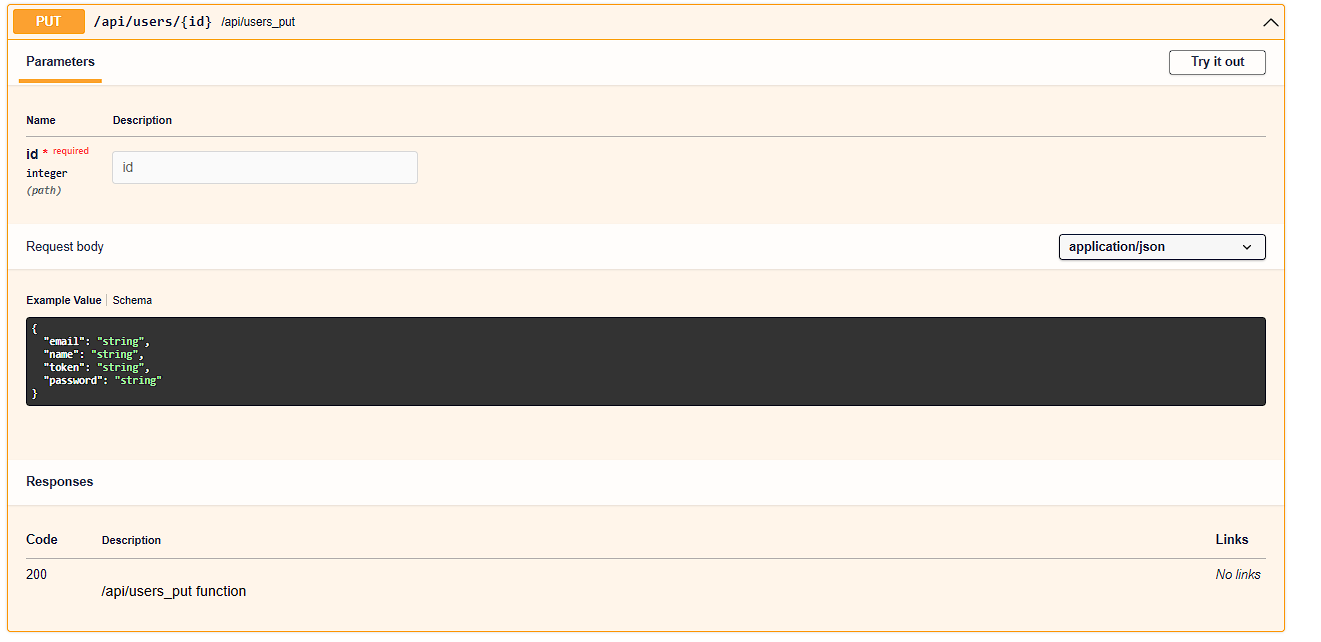
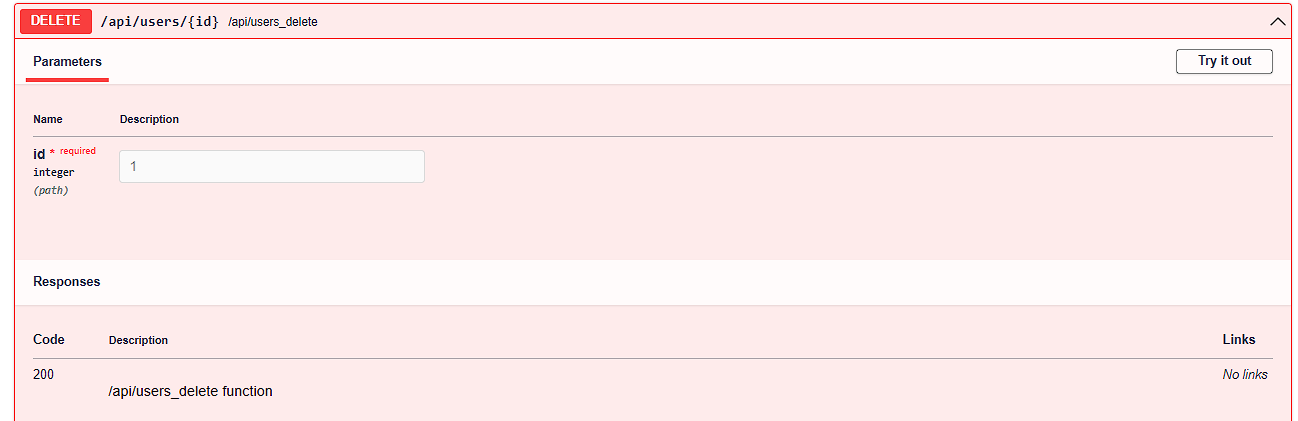
GET /product → HTML page with DataTable
GET /api/product → JSON list of all products
GET /api/product/{id} → JSON single product
POST /api/product → Create new product
PUT /api/product/{id} → Update product
DELETE /api/product/{id} → Soft delete (active=0)
Features
- ✅ Validates model exists before generating
- ✅ Responsive DataTable with search and pagination
- ✅ Create and Edit modals
- ✅ Soft delete functionality (active=0)
- ✅ Pydantic validation examples (commented)
- ✅ Multilingual support
- ✅ Auto-imports in main.py
Customization
After generation, you can customize:
- Import in
main.py
the generated route
- Edit
app/routes/{name}.py
to add business logic
- Uncomment Pydantic models for validation
- Customize the HTML template
- Add custom middleware
React Islands Integration
Lila provides a powerful "React Islands" architecture, allowing you to embed interactive
React components directly into your Jinja2 templates.
This approach combines the best of both worlds: the SEO and performance of server-side
rendering with Lila, and the interactivity of React.
Installation
To set up the React environment in your project from the root directory, run:
This will scaffold the package.json,
vite.config.js,
and the react/
directory structure.
Usage
Once installed, you can use the new Jinja2 helpers vite_assets()
and react().
- vite_assets(): Injects the necessary script tags. In
DEBUG=True
mode, it connects to the Vite development server (HMR). In production, it loads the
optimized assets from public/build.
- react(component, props): Mounts a specific React component.
Example of a full HTML template:
<!DOCTYPE html>
<html lang="{{ lang }}">
<head>
<meta charset="UTF-8" />
<meta name="viewport" content="width=device-width, initial-scale=1.0" />
<meta name="color-scheme" content="light dark" />
<meta http-equiv="X-UA-Compatible" content="ie=edge" />
<meta name="description" content="{{ description }}" />
<meta name="keywords" content="{{ keywords }}" />
<meta name="author" content="{{ author }}" />
<title>{{ title }}</title>
<link rel="icon" type="image/x-icon" href="{{ public('img/lila.png') }}" />
<link rel="stylesheet" href="{{ public('css/lila.css') }}" />
{{ vite_assets() | safe }}
</head>
<body>
<main class="mt-4 container">
<h1>Example React integration</h1>
<div>{{ react('Counter', {'start': 3}) | safe }}</div>
</main>
</body>
</html>
How it Works
Development (DEBUG=True):
The vite_assets()
helper injects scripts pointing to http://localhost:5173.
You can start the dev server with:
npm run dev
# OR
lila-react dev
Re-rendering React Islands
You can trigger a re-render of your React islands from standard JavaScript (e.g., from
Twig
templates, jQuery, or other non-React components) using the global function
window.renderReactComponent(name).
This is useful for updating components that rely on shared client-side data like
localStorage from other independent DOM elements without needing a complete
page
reload.
//Example in client
// Re-render all React components on the page
renderReactComponent();
// Re-render only components named 'CartBadge'
renderReactComponent('CartBadge');
Production (DEBUG=False):
Run npm run build
to compile your React code into public/build.
The helper will automatically detect the manifest.json
and load the hashed CSS and JS files for optimal performance.
Benefits
- SEO with Jinja: Your main page content is rendered by Jinja,
ensuring search engines can read it perfectly.
- React Interactivity: Use React only where needed (Islands
architecture).
- Secure Sessions: You can rely on Lila's secure, signed sessions
using
itsdangerous
for authentication, while the React components communicate with your API endpoints.
React Render (render components with
htmlResponse without templates jinj)
This reactRender method is used to return the HTML directly and load a React page or
component,
with styles, meta tags, custom scripts, and content/props.
from lila.core.templates import render,renderMarkdown,renderReact
...
router = Router()
@router.get("/react-page")
async def react_page(request: Request):
response =renderReact(request=request,component="Counter",
props={
"start": 5
} ,
options={
"title": "React Page",
"description": "A React page with a counter component",
"keywords": "React, counter, component",
"author": "Lila",
"styles": ["css/lila.css"]
}
)
return response
Simple Generation of REST API CRUD
At Lila, we have a simple way to generate CRUDs with
automatic documentation, allowing
you to
create your REST API efficiently.
Thanks to the combination of SQLAlchemy and Pydantic
models, it
is possible to perform data validations and execute structured queries for API
generation.
Additionally, you can integrate custom middlewares to validate tokens,
manage
sessions, or process requests. With just a few lines of code, you can generate a fully
documented REST API CRUD.
If you haven't already, enable migrations when you start the server
.
By default it uses SQLite, it will create a database file lila.sqlite
in
the
project root.
from lila.core.request import Request
from lila.core.responses import JSONResponse
from lila.core.routing import Router
from pydantic import EmailStr, BaseModel
from app.middlewares.middlewares import validate_token, check_token, check_session,login_required
from app.connections import connection # Conexión a la base de datos con SQLAlchemy
from app.models.user import User # Modelo 'User' de SQLAlchemy
router = Router()# Inicializa la instancia del enrutador para gestionar las rutas de la API.
# Modelo Pydantic para validaciones al crear o modificar un usuario.
class UserModel(BaseModel):
email: EmailStr
name: str
token: str
password: str
# Definiciones de middlewares para operaciones CRUD
middlewares_user = {
"get": [],
"post": [],
"get_id": [],
"put": [],
"delete": [check_session, check_token],#Ejemplo de middlewares para sesión web 'check_session' y jwt 'check_token'
"html":[login_required] # Si generate_html es True en router.rest_crud_generate
}
# Generar automáticamente CRUD con validaciones y configuraciones
router.rest_crud_generate(
router=router,
connection=connection, # Conexión a la base de datos
model_sql=User, # Modelo SQLAlchemy
model_pydantic=UserModel, # Modelo Pydantic
select=["name", "email", "id", "created_at", "active"], # Campos a seleccionar en las consultas
delete_logic=True, # Habilita el borrado lógico (actualiza 'active = 0' en lugar de eliminar registros)
active=True, # Filtra automáticamente los registros activos ('active = 1')
middlewares=middlewares_user, # Middlewares personalizados para cada acción CRUD
)
You can create your own middlewares and pass them as a list to customize
security and validations for each rest_crud_generate
operation.
To generate the documentation, always remember to
run it after the routes router.swagger_ui()
and
router.openapi_json()
Function Parameters for rest_crud_generate
Below are the parameters that this function accepts to generate CRUD automatically:
def rest_crud_generate(
self,
connection,
model_sql,
model_pydantic: Type[BaseModel],
select: Optional[List[str]] = None,
columns: Optional[List[str]] = None,
active: bool = False,
delete_logic: bool = False,
middlewares: dict = None,
jsonresponse_prefix:str='',#Return with prefix list o dict 'data' first key
user_id_session:bool| str=False #Example 'user id' to validate in query with where 'user_id'= id session_user
) :
Automatic Documentation
Below is an example of the generated documentation for the
rest_crud_generate
function:
Go to http://127.0.0.1:8000/docs,
or as configured in your .env file (by
HOST and
PORT).
GET - Retrieve all users
GET - Output of all users
POST - Create new user
GET_ID - Retrieve a specific user
PUT - Update user
DELETE - Delete user
In this example, we did it with 'users', but you can apply it however you want according
to your
logic ,'products','stores',etc. Even modifying the core in core/routing.py.
For both the 'POST' or 'PUT' method function,
If the framework detects that you pass data in the request body such as:
'password' , it will automatically encode it with argon2 to make it secure.
Body example :
{
"email":"example@example.com",
"name":"name",
"password":"my_password_secret"
}
Then, if you pass 'token' or 'hash', with the helper
function
generate_token_value
, it automatically generates a token, which will be saved in the database as the 'token'
column
with the value generated by the function
.
Body example :
{
"email":"example@example.com",
"name":"name",
"password":"my_password_secret",
"token":""
}
With 'created_at' or 'created_date' , it will save the date and time of the moment, as
long as
that field exists in the database table.
Body example :
{
"email":"example@example.com",
"name":"name",
"password":"my_password_secret",
"token":"",
"created_at":""
}
For the 'PUT', 'GET' (get_id) or 'DELETE' methods
It is optional according to the logic of each REST API, you can pass it as
query string
, user_id
or id_user,
an example would be GET, PUT or DELETE as a method
to the url http://127.0.0.1:8000/api/products/1?user_id=20
Where it validates that the product ID '1' exists but also that it belongs to the user ID
'20' .
New Parameters for HTML CRUD Generation
In addition to generating the REST API CRUD, rest_crud_generate now accepts three new parameters to
create a fully functional HTML CRUD directly:
- generate_html: bool = True – Automatically generates an HTML CRUD
page using a responsive Lila datatable. Useful to generate the interface only during
development.
- rewrite_template: bool = False – If True, overwrites existing
templates.
- url_html: str = None – Optional. Specify the output URL for the
HTML. If not provided, the HTML can be copied and used in any route.
This feature allows you to create CRUD pages with create, update, delete,
pagination, validations and uses the same REST CRUD API as backend.
It is ideal for quickly creating multiple CRUDs in HTML and backend for your
application: with around 30 lines of code, you get a fully functional HTML CRUD ready
for minor edits—or ready to use as is.
You can pass DEBUG from from app.config import DEBUG to generate_html so the HTML is only generated in development.
If you set generate_html=False, the HTML is not generated
automatically and can be used as you like.
Admin Panel
The Admin
module allows you to manage an admin panel for your application.
It includes authentication, model management, system metrics, and more. This panel is
highly customizable and integrates easily with your application.
The admin panel is now more modular and flexible. All admin-related components
(templates, routes, and configuration)
are located in the admin
folder, making it easier to customize and extend.
Key Features
- Authentication: Secure login and logout for administrators.
- Model Management: Automatically generates routes and views to
manage your models.
- System Metrics: Monitors memory and CPU usage for both the
application and the server.
- Password Management: Allows administrators to change their
passwords.
- Logs: Enables administrators to view application
Logs.
Basic Usage
To use the admin panel, you need to import the Admin
class from
admin.routes
and pass it
an optional list of models you want to manage. Each model must implement a
get_all
method to be displayed in the admin panel.
# English: Here we activate the admin panel with default settings.
# Español: Aquí activamos el panel de administrador con configuraciones predeterminadas.
from app.routes.admin import Admin
from app.models.user import User
admin_routes=Admin(models=[User])
all_routes = list(itertools.chain(routes, api_routes,admin_routes))
Setup and Migrations
Before using the admin panel, you need to run the migrations:
Creating Admin Users
Admin users can be created via command line with customizable parameters:
# Default usage (random password generated)
lila-create-panel-admin
# With custom username and password
lila-create-panel-admin --user myadmin --password mysecurepassword
Generated Routes
The admin panel automatically generates the following routes:
You can access the templates in the templates/html/admin
folder.
- Login:
/admin/login
(GET/POST)
- Logout:
/admin/logout
(GET)
- Dashboard:
/admin
(GET)
- Model Management:
/admin/{model_plural}
(GET)
Authentication Middleware
To protect routes and ensure only authenticated administrators can access them, use the
@admin_required
decorator from core/admin.py.
from lila.core.admin import admin_required
@router.route(path="/admin", methods=["GET"])
@admin_required
async def admin_route(request: Request):
menu_html = menu(models=models)
return await admin_dashboard(request=request, menu=menu_html)
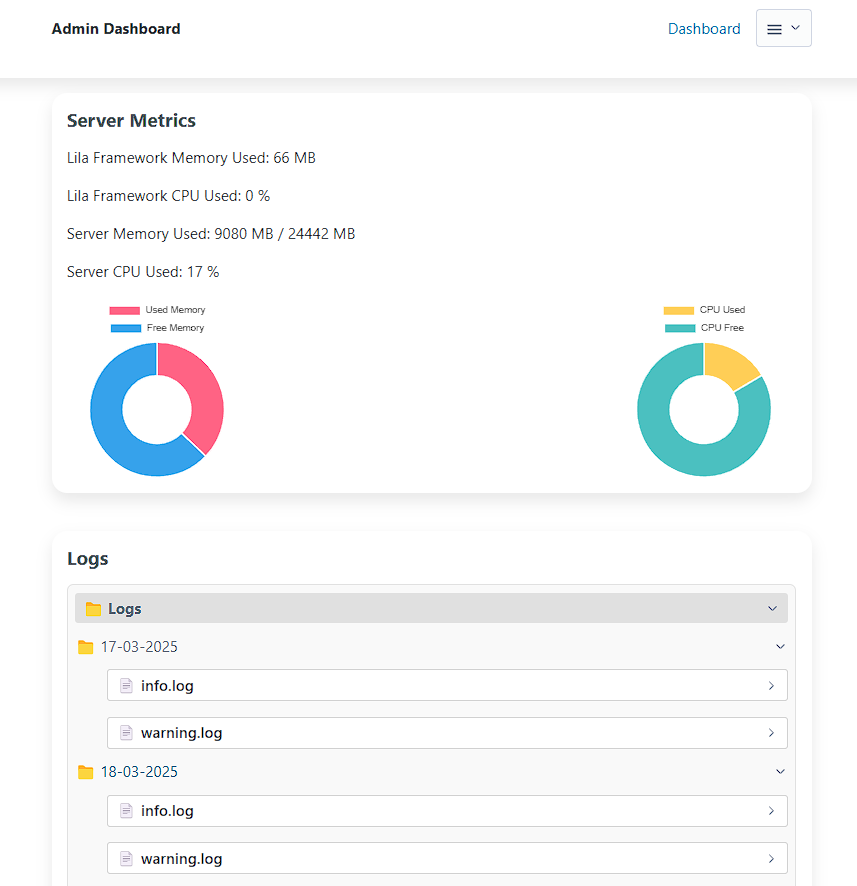
System Metrics
The admin panel displays real-time metrics, including:
- Lila framework memory usage.
- Lila framework CPU usage.
- System memory usage.
- System CPU usage.
These metrics are updated every 10 seconds.
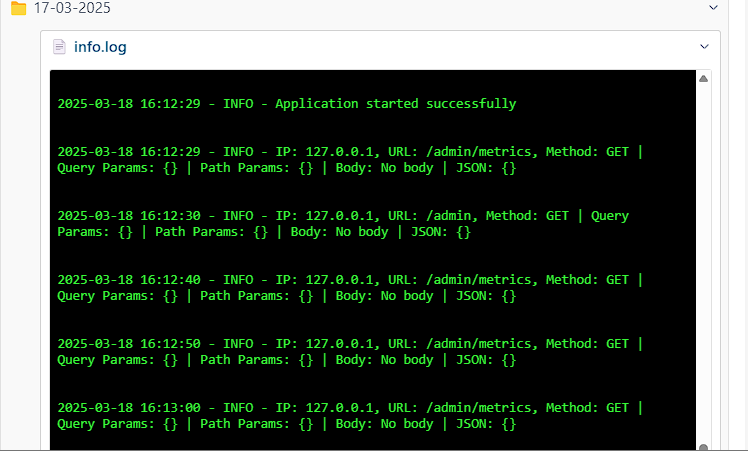
Logs
In Lila, we use a middleware that you can enable or disable if you want to use
Logs
for info, warnings, or errors in your application.
The middleware is located in core/middleware.py
and is added to the
application with:
app.add_middleware(ErrorHandlerMiddleware).
This helps generate logs that you can view in the admin panel, organized by date (in
folders) and type.
Creating Administrator Users (Simple Command)
In addition to the full panel creation command, you can now create individual
administrators without affecting routes, middlewares, or existing configurations.
This command is useful for quickly adding new admin users.
# Create an administrator with specific username and password
lila-create-admin --username myadmin --password mysecretpassword
# Create an administrator with a custom username and auto-generated password
lila-create-admin --username myadmin
Note: This command only adds the admin user to the database. It does
not generate routes, middlewares, or templates, so it can be used even if the panel is
already active or customized.
Minify files for production
With the lila-minify
command you can minify your js, css files,
which are in the public
and templates
folders.
Deployment to Production
Linux Server
(with systemd)
To deploy your Lila application on a Linux server, it's recommended to use a virtual
environment and a systemd service to manage the process.
1. Create a
Virtual Environment
python -m venv venv
source venv/bin/activate
pip install -r requirements.txt
2. Create a Start
Script
#!/bin/bash
source /path/to/your/project/venv/bin/activate
python /path/to/your/project/main.py
3. Create a
systemd Service
[Unit]
Description=Lila Framework Service
After=network.target
[Service]
User=your_user
Group=your_group
WorkingDirectory=/path/to/your/project
ExecStart=/path/to/your/project/start_lila.sh
Restart=always
RestartSec=10
Environment=PATH=/path/to/your/project/venv/bin:/usr/local/sbin:/usr/local/bin:/usr/sbin:/usr/bin:/sbin:/bin
Environment=PYTHONPATH=/path/to/your/project
[Install]
WantedBy=multi-user.target
4. Enable and
Start the Service
sudo systemctl daemon-reload
sudo systemctl enable lila.service
sudo systemctl start lila.service
chmod +x /path/your_project/start_lila.sh
Windows Server
On Windows, you can use the Task Scheduler to run your application at startup.
- Create a `.bat` or `.ps1` script to start your application.
- Open Task Scheduler and create a new task that runs at system startup.
- Set the action to run your script.
Disable Debug
Mode
In your `.env` file, make sure to set `DEBUG=False` for production.